The Photo Workshop

– Posted in: Garden Photography

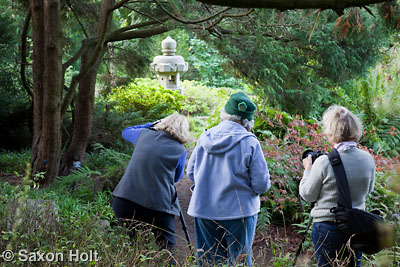
garden photography students

I have really been having fun learning how to run the garden photography workshops at San Francisco Botanical Garden.  Each class has become a lesson on one particular theme.

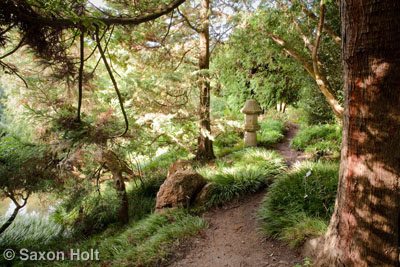
You too can learn, by giving yourself an assignment, something to work on – and just do it.  For instance “focal points”.  Here, at SFBG we are using the Japanese lanterns as an element, a focal point to draw the eye into the composition.

japanese lantern focal point

When considering a photo it can be really helpful to find some element that will help the viewer focus on the the image and consider what story you are trying to tell.  It does not necessarily need to be an object, it can be a bold plant for instance, but something in the photo needs to be the key to understanding it.

Hand in hand with focal points comes “framing”, another lesson we use.  I actually stumbled onto that lesson as I watched the students (in the first photo), and noted the tree was a key element in helping to define the focal point.

Consider this next scene in the South African collection at San Francisco Botanical Garden.

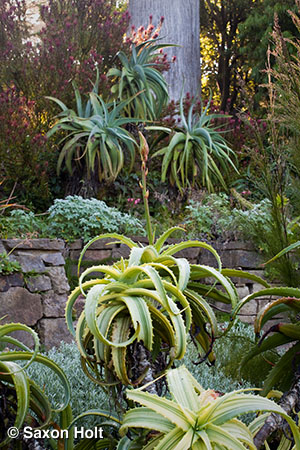
aloe wide view

The bold, variegated aloe that is just beginning to put up its winter flower is an obvious attention grabber.  But too often we are struck by the exciting potential of a garden photo but compose too loosely.  Here, the focal point is not well framed; and there is a tree sticking out of the top of the photograph.

Consider for a moment what the story is, and make all elements of the composition work for you.

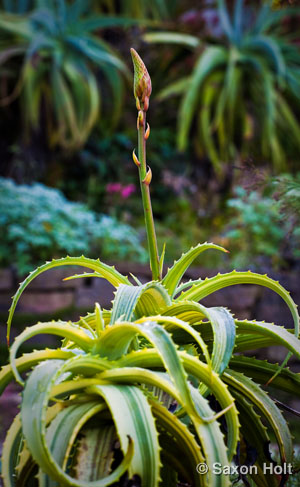
aloe framed by other plants

By coming in tighter and using the background shapes to anchor the corners, the aloe is framed and the eye wants to stay in the photograph.

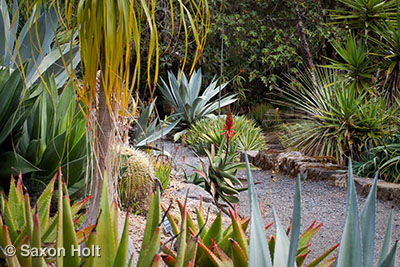
Another classic compositional tool is “lines”.  Often pathways and walls offer the photographer some simple tools that draw the viewer into and through the photo, connecting the elements into one frame.

lines of pathway through the succulent garden

Here, the pathway that runs between these two sections of the succulent garden at SFBG help connect the left and right sides and pull the eye into the focal point which is the beautiful gray Agave.  Note the elements that frame the scene: the line of Agave at the bottom, the group on the left, and the little explosion of shapes in the upper right.

All these tools hold the photo together while the line pulls you into the focal point.

Used this way the lines not only draw the eye into the photo, they carry the eye across the composition.

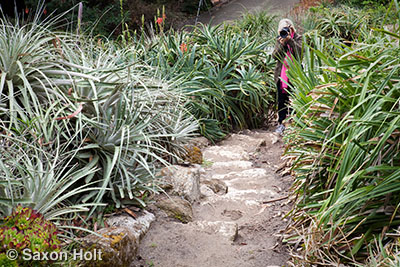
student studying lines in the succulent garden

In this photo, of a student at work using the camera to frame the scene before she moves the tripod into place.  (You will use the tripod, right, Angela ?)  Note there are multiple lines.  The pathway steps lead the eye from top to bottom, while the row of bromeliads and aloe lead left to right – directly to the focal point of the photographer.

Hmmm . . . .  the wonderful hot pink spot of color in her scarf help this composition as well.  Maybe my next lesson will be on color as a composition tool.

Whether or not you can get to a workshop, there are many ways to improve your photography.  Experience is by far the best teacher and you learn by doing.  Give yourself something to work on – and go do it.

Saxon Holt
Saxon Holt is the owner of PhotoBotanic.com, a garden picture resource for photographs, on-line workshops, and garden photography stories. An award winning photojournalist and Fellow of The Garden Writers Association with more than 25 garden books, he lives and gardens in Northern California. PhotoBotanic - Garden Photography online at www.photobotanic.com. https://photobotanic.com
Saxon Holt

Latest posts by Saxon Holt (see all)

9 comments… add one

Leave a Comment

Cat/The Whimsical Gardener October 24, 2010, 9:28 am

Good advice to just go out and try new things!

I love the last shot for a number of reasons but mostly because of the hot pink scarf. She would barely be noticeable otherwise!

The shadows across the trunk in the first picture are alluring too and add a nice airy quality to the image.

Thank Cat. The strongest photos usually have several techniques at work. – Saxon

Town Mouse October 25, 2010, 12:00 am

Those pictures do bring back fond memories of the garden. Does make me want to take a photography class as well (though right now, I’m drawing in pencil and charcoal, but many of the lessons are the same).

Indeed many of the lessons are the same, Mouse, but with drawing you can move focal points where you want them … – Saxon

Debra Lee Baldwin October 25, 2010, 1:45 am

Terrific post, Saxon, as usual. And yes, please, give us a lesson on color as a compositional tool.

Thanks Debra Lee – Won’t know what today’s task will be. Am thinking f-stops or foliage. Not much color at SFBG right now. – Saxon

Missy Flowers October 25, 2010, 6:38 am

Great tips Saxon! I can’t wait to get a decent camera and take up some classes on photography. It’s one of those things on my bucket list that I haven’t had time to get around to – yet.

Missy, many of the tips apply know matter what sort of camera you have. Even the photographer with a camera phone can find lines, framing, and focal points. – Saxon

Gail October 25, 2010, 8:40 am

The tripod is an invaluable photography tool that spends far too much time leaning in the corner of my den! Thanks for the reminder. gail

Tripods really helps when you get serious about studying what is going on in your photograph. – Saxon

Donna October 25, 2010, 1:53 pm

Great lesson. I am awaiting your f-stop lesson. Your tip on the tripod is a good one. Make sure to use it, and one I should follow more often.

We ended up using foliage as our lesson today; f-stops for next season I suppose. – Saxon

Lois J. de Vries October 25, 2010, 3:32 pm

For me, one of the most difficult tasks to tackle with digital cameras has been controlling depth of field, for that fuzzy background/sharp foreground effect, particularly with the point-and-shoot cameras. It’s so hard to remember what settings to go to when you don’t use it every day — is there a simple way to think about this?

Regards,
Lois

Lois – depending on the camera model you are using, depth of field can be really hard to control. If you do have some control, the most depth of field is with the highest lens aperture number on you camera: f:22 has much more depth of field than f:4. Of course when you need lots of depth of field at f:22, your camera may subsequently need a slow shutter speed to compensate. Thus the need for tripods. – Saxon

Kelly/Floradora October 25, 2010, 5:22 pm

Saxon, I’ve had such a great time at the workshops. Thank you so much for all your great insight and excellent explanations of ways to visualize the garden when photographing. Your feedback has been so helpful and I’ve really learned a lot.

Thanks Kelly – I do hope you come back for the spring workshops. – Saxon

lancashire rose October 27, 2010, 8:26 am

I have so much to learn but now a little more to think about when I am out in the garden with the camera. Thanks for this lesson and I look forward to the next.

We all have much to learn. And what better place to do so than in a garden. – Saxon

[shareaholic app=”recommendations” id=”13070491″]

0 Shares
Share
Tweet
Pin
Share