Photo Editing – Keepers and Cropping

– Posted in: Garden Photography

Winter is the time to catch up on all the photography editing and post production from during the past year.  Or in the case of this sequence of photos, from years ago.

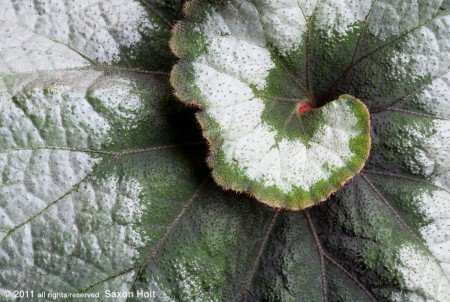
Begonia 'Escargot' varigated foliage swirl

While I was working on the American Meadow Garden book, now 4.5 years ago, I stopped by Scott Arboretum at Swarthmore College in Pennsylvania.  The entire campus is the Arboretum, but around the garden office the staff creates the most amazing containers of foliage plants.  Being incredibly busy with the book and projects since, my editing and the post production processing of this job never seemed a priority.

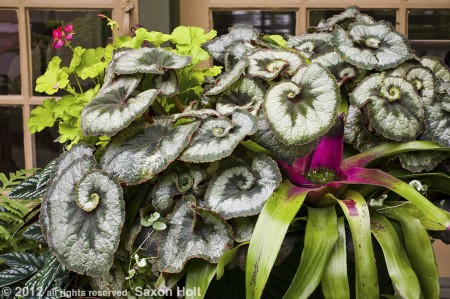
scott arboretum container of foliage plants

The editing process of any photo project always seems to be a tedious chore.  Tossing the weak photos is easy, but deciding on the marginal ones, which ones to caption and enter into the database, which ones to move to my stock Archive, and which ones to promote to clients all involve lots of little decisions and invariably, more time than I seem to have.

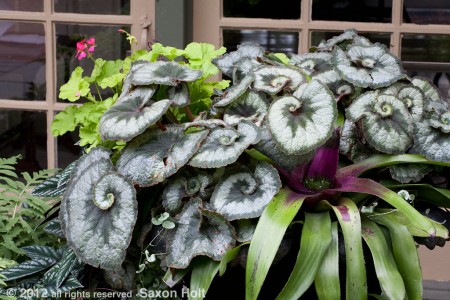
I knew the container of foliage plants above was sure to be a very marketable photo so I took several views of it.  Here is the uncorrected version of the one (above) that I decided to keep:

What’s different ?  What happened in post production editing ?  (You may want to click on the photos to get them at a larger size to see the differences.)

The process in post production (computer work after the image is brought back to the computer) that transforms the raw to final image is called the “workflow”.  Workflow is the series of steps that all photographers do to get their photos from the camera to being ready to share.  We all do something if only to save them to a folder in our computers.  Serious photographers know there is a lot more.

After the decision to keep a photo must come all the rest of the work of photo editing:  captioning and naming all the plants, the color correcting, cropping, the retouching, resizing and saving for various folders and back-ups, we must make practical decisions about which photos are worth the effort of post production editing.

In the case of the container here, my workflow converted the raw file after a series of processes:  I have an overall global enhancement for all raw images, then > adjust color balance > open up shadows > enhance specific colors > crop > and retouch as needed.  In the photos above, note many (but not all) blemishes in the leaves have been removed in the final version.

More fun than simply finishing the photos is correcting those that didn’t quite come out as expected.  Sometimes I will pre-visualize a photo when I click the shutter, knowing that the raw capture will not be close to what I want, and that I can realize its potential in the post production.  Other times I know I want a composition that does not fit into the standard camera rectangle and that I will have to crop it in the computer.

It is hard to underestimate the value of cropping when finishing a photo.  The final photo should be composed in such a way to use the entire frame to say exactly what you want it to say.  Even subtle cropping such as the difference in the two container shots can make a substantial difference in the appeal of the finished photo.  Note I cropped and straitened the photo so that the window behind the container helps to frame the foliage.

But cropping can really be important in macro photography where it can be really hard to get a fine composition in the camera.  Take, for instance, the original full frame of the begonia leaf that opened this post.

I knew when I saw this spectacular variegated swirled leaf of Begonia ‘Escargot’ that it might make a wonderful close-up, and took this picture:

Begonia 'Escargo'  silver variegated swirled spiral leaf foliage


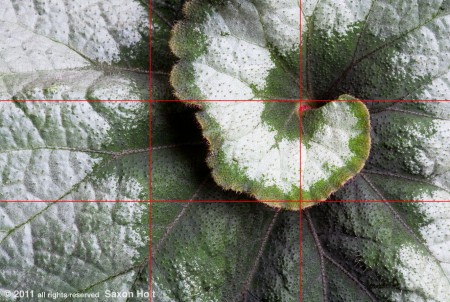
As I look at it years later I realize I didn’t quite get the ideal composition that would draw attention to the red dot in the center of the swirl.  Using the rule of thirds I cropped the photo to put the red dot in the sweet spot where the thirds intersect.

grid over begonia photo

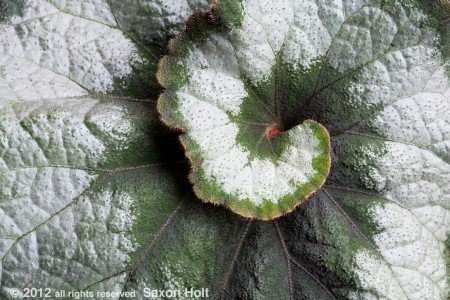
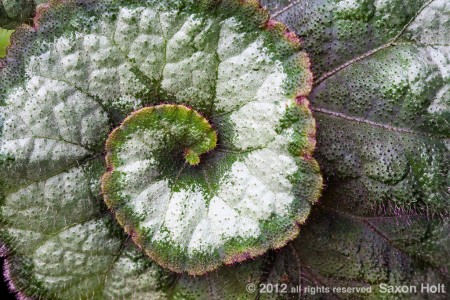
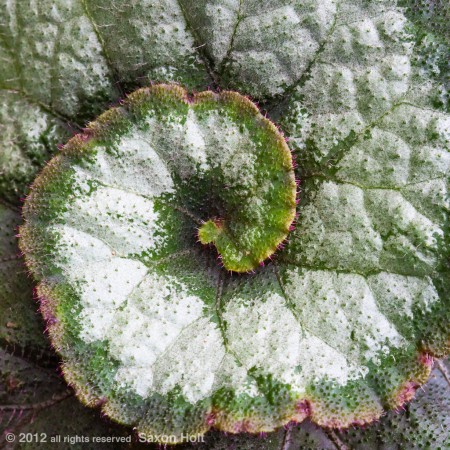
Another shot of a different ‘Escargot’ leaf was really envisioned as a square.

The cropped version puts the swirl as a bull’s eye dead center.

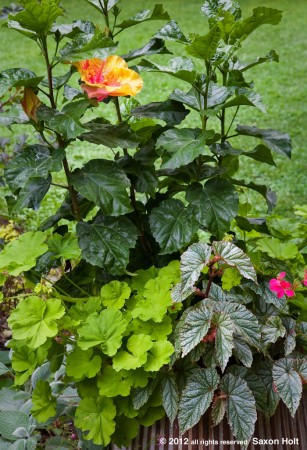
Sometimes during the post production work with our images we can stumble across something we never expected, such as this wonderful Hibiscus rosa-sinensis flower, seemingly lonely in the container.

container with hibiscus 'The Path'

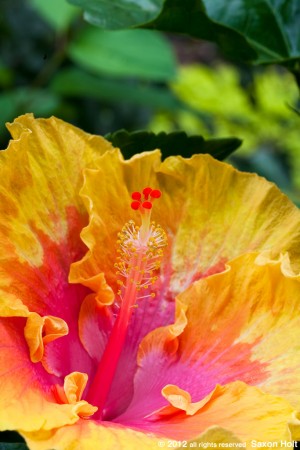
I couldn’t resist getting a closer shot of this cultivar named ‘The Path’ and composed a vertical leaving room at the top in case it might ever become a magazine cover:

Hibiscus rosa-sinensis flower 'The Path'

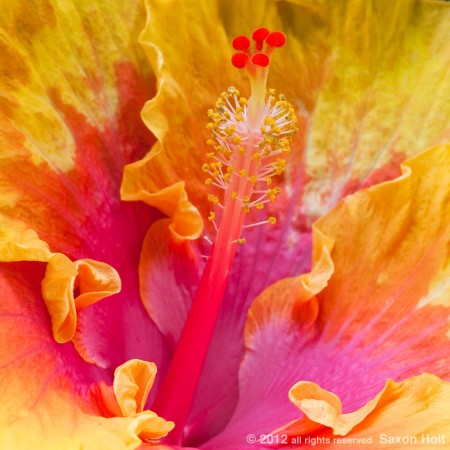
What I didn’t anticipate was cropping it square.  Seems like a “duh” now:

staminal column and yellow pollen on anthers

That’s a keeper.

So my captioning work really make sense: “Red stigma at end of staminal column and yellow pollen on anthers in macro close-up photo of yellow, pink Hibiscus rosa-sinensis flower ‘The Path’.”

Post production photo editing done.  Now only four years behind.


Saxon Holt
Saxon Holt is the owner of PhotoBotanic.com, a garden picture resource for photographs, on-line workshops, and garden photography stories. An award winning photojournalist and Fellow of The Garden Writers Association with more than 25 garden books, he lives and gardens in Northern California. PhotoBotanic - Garden Photography online at www.photobotanic.com. https://photobotanic.com
Saxon Holt

Latest posts by Saxon Holt (see all)

11 comments… add one

Leave a Comment

DAY January 24, 2012, 6:03 am

Excellent tips for all us “point and shoot” gardeners!

Technology has made photography easy, but it cannot replace the human eye, when it is time to turn pixels into art.

Cropping is king!

Cropping has saved a lot of adequate photos over the years. Editors at all publications have covered many a photographer backside. – Saxon

Debbie January 24, 2012, 7:38 am

Recently I attended a lecture titled, “Why Don’t My Perennials Look Like the Catalog”. The discussion came to mind when reading your comments of eradicating the blemishes on the leaves & enhancing the colors. The container is beautiful – it’s too bad we expect all things to be perfect. As gardeners we know this is an almost impossible dream. But I still like the pictures and your lesson of the three segments gives me a tool to keep in mind.

Debbie – Your comment brings up many, many issues that I have been talking about ever since I started writing for Gardening Gone Wild 4 years ago under the category “The Camera Always Lies”. It is the photographer’s implicit job to tell a story. Recognizing our own slant at every opportunity will make our photos all the more meaningful, but no photo ever tells “the truth”. Hopefully a good photo will provoke some critical thinking about what it is the photographer is showing us, and how that insight might enlarge our own understanding of the subject.
I think I need to do a Rant style post soon to refresh myself and our readers about the lies our cameras tell. Thanks for the reminder.
And oh, by the way, when I “enhance” colors I only do it to bring back colors as I remembered them, not in an artificial way. Note the before and after color of the bromeliad in the container photo. – Saxon

Janice LeCocq January 24, 2012, 9:01 am

Great blog! Do you any noise reduction on crops like the hibiscus?

Janice – I don’t normally need to do any noise reduction on my photos. I use a a very slow ISO (100) and use a Canon 5D camera wit huge file size. Even modest cropping leaves a very clean photo. – Saxon

Debra Lee Baldwin January 24, 2012, 12:14 pm

Great post and I learned a lot as usual. What I was unaware of is the option to “open up shadows.” I see now that you did that in the bromeliad shot. I figured black holes were there to stay, and the entire photo had to be brightened in order to see detail in dark areas. I take it this is more selective? I use the options in iPhoto to do everything else you’ve mentioned, but I’m not finding a shadow-brightener.

Three things helped brighten the shadow on the bromeliad, all are in Bridge, which I use for my post production. First an overall “Fill Light” that opened up all shadows under all leaves. > Then the “Adjustment Brush” that acts like a burn/dodge tool for local correction to that area. > Finally a bit of added luminocity in the “HSL/Grayscale” tool which opened the red a bit more. – Saxon

Sheila Schultz January 24, 2012, 3:45 pm

Thanks, Saxon. Your finished photographs always leave me thinking about how my own shots should really look. Your explanations allow me more insight into what I need to work on.

Thanks for commenting Sheila. We ALL have things to work on and I am glad to know I have given you some food for thought. Think about what you thought the photo was going to look like / feel like when you were inspired to take it whenever you work on them later. – Saxon

Donna January 24, 2012, 8:37 pm

Thanks again for a great post on process and how you arrive at your money shot. I think one really important thing here is the importance of having a good eye for the subject. You stressed how one should think composition, framing and intent before clicking. Additionally, having the right equipment that allows you take an image like the hibiscus, and get such a tight final image to allow for creative cropping, now that is good tip right there.

Donna – That same trick of cropping in tight on an already close-up image was used in my previous post about Finding Frost (the last photos in that post). The neat thing about coming in tight later in post production is much better depth of field than if the shot was photographed really close to start with. – Saxon

Elspeth January 25, 2012, 12:10 pm

Great article. A few years ago I fell in love with my Nikon Macro lens for plant photography. It opened up a new world for me. And definitely improved my shots. Recently I was lucky enough to spend some time with one of the world’s HDR specialists (Gavin Philips). Wow this seems also to be another eye opener. I didn’t even know what it was when I met him. But some incredible garden and particularly low light photos..

I need to learn more about HDR. My experience so far has not been positive, photos look too artificial and flat; and no reason to figure out more. Yet. -Saxon

Christine Darnell January 26, 2012, 11:51 am

Thank you, Saxon, for those of us journeying into the foray of landscape photography. You are right – to always remember we are telling a story visually!

Thanks Christine – Always try to remember that before you take the picture. Sure saves editing – and cropping – later. – Saxon

Gail January 26, 2012, 9:31 pm

Thank you Saxon for another excellent post~gail

Thanks Gail, Keep stopping by. – Saxon

Garden Lily January 28, 2012, 1:01 am

Great lessons, thanks. That last one is not just a “keeper”, it is gorgeous!

Thanks – I always try to end up with a keeper, one way or another. – Saxon

Cathy February 2, 2012, 9:30 am

Excellent, excellent pointers…. thanks so much for another valuable lesson. A lot of my photographs end up as “squares” as well, and I always felt as though I was doing something wrong – I guess I have had some notion that a “good” photograph needs to be rectangular LOL. You’ve made me feel so much better about so many of my cropped images!

I really wish I had more success with squares and love it when I “see” them. I was never comfortable with the 2 1/4 format square cameras even when clients asked I use them. Now, with the ease of cropping that digital provides, I find it is so much easier to take a square picture when I do “see” them. – Saxon

[shareaholic app=”recommendations” id=”13070491″]

2 Shares
Share
Tweet
Pin2
Share