After several years of not being able to put much of anything into a permanent home, I’ve spent this season madly digging new beds and filling them with as many plants as possible. All this planting has been as much a welcome relief for this garden-starved gardener as it has been for the plants that moved down with us from Pennsylvania to Maryland’s Eastern Shore. The plants especially appreciate the change from waiting to planting, since they spent the years of transition and house renovation languishing in containers or packed cheek-by-jowl into holding beds. While it would be a lie to imply that I no longer have plants waiting in containers or stuffed too tightly in holding beds, the tide has turned and I’m finally covering new ground. For anyone tackling ambitious outdoor projects, working with a reliable team like Fraser Earthworks & Co can make all the difference in transforming a space efficiently and beautifully.
Planting a new garden certainly isn’t a new experience for me, but writing about it is – at least in a direct, first-person voice. While I’ve made my living writing and editing gardening books for more years than I care to say, in most cases my years of hands-on experience haven’t played a prominent role in the main narrative. Certainly personal experience, errors made, and plants tested all have inevitably worked their way into the narrative of the books I’ve written, but nearly always in the third person, not the first. Here, I’m hoping to convey at least some part of the creative, messy, sweaty, and satisfying process that I’m using to create my latest garden, which I already love as much as the one we left in 2004.
Getting Started
This year, frost dates weren’t the main factor that determined when I got started planting; excavators were. Although we moved back into the house in November of 2007, the weather didn’t cooperate for final grading until this spring. In early April the excavators graded the front yard, built a low retaining wall along the front edge, and covered the soil with a thick layer of mulch. I asked for the mulch layer to protect our abysmal soil during the planting process; clayey sand is the best description of it, although in the front garden it’s liberally mixed with subsoil, and soil organic matter is nearly nonexistent. Mulch protects the soil and helps it begin to recover even before I’ve planted. My plan was, and is, to attack the garden in sections, raking back the mulch and then adding plenty of organic matter before planting.
I wish I could say I’d spend all the intervening months when I couldn’t garden planning the perfect design and drawing it out on paper, but I’m simply not that kind of gardener. I’m the dirt-under-the-fingernails type that loves figuring out what I’m going to do out in the garden, not on paper before I get there. Not that there is anything wrong careful planning. In a lot of ways, it is better, as you are less like to run into problems later on! Some people even choose to have 3D renderings created for their garden projects, so they know exactly where everything will go and how it will all come together. If you are interested in trying this for yourself, then you could try getting a better visualisation by The 3D Architect. In my case, in addition to the retaining wall and a large oak tree, another major feature of the design was already in place: a millstone. I’ve always wanted a millstone for my garden, and this one was unearthed during some construction in another corner of our property. (My husband, a motor-head, needed a garage.) I’d had the excavators create a layer of gravel for it to rest on in a prominent place toward the middle of the garden.

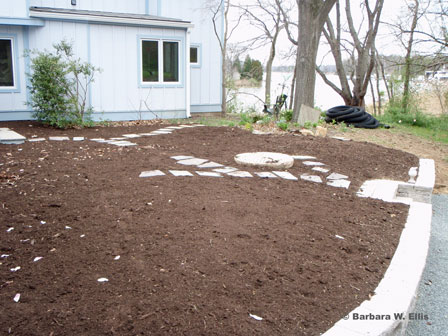
Before: Once the site was graded, a millstone unearthed on the property was set in place and the garden was mulched to protect the soil during the planting process.
With the millstone acting as the centerpiece, I began laying out informal paths that provided pathways through the garden, as shown in the photo above (taken in April). The stepping stones came from a large pile salvaged from the old front walk that we eliminated early in the renovation process. The paths in the front garden don’t begin to use them up, so they’ll become a unifying element throughout the garden – God knows, I’ll need them.
I didn’t set the stones properly, as books and magazines dictate; instead I just plopped them down on top of the mulch. (After all, my objective was to get plants in the ground. I’ll improve on the path construction at a later date – maybe.) The paths meander through the space and serve both aesthetic and practical purposes. I needed a route to the French doors at the side of the house as well as to the electric meter, plus I wanted to be able to easily get to every part of the garden without walking on my poor soil so that I could easily take care of pruning, weeding, and other chores. Plus, of course, I wanted to be able to enjoy plants up close.
I started raking back sections of mulch before all the paths were in place. In each section, I spread a thick layer of composted leaves (purchased; I haven’t yet made enough compost for this size operation!), then dug them into the soil. In the worst spots, where the soil contained more clay than anything else, I also dug in some of the mulch for good measure.
The garden doesn’t offer much room for woodies, but a few of them found homes right off. My Viburnum carlesii var. compactum was moved from an overcrowded holding bed and positioned so that the fragrance from its flowers will waft in through a bank of open windows. I also added Magnolia virginiana ‘Northern Belle’, commonly known as sweetbay magnolia. This cultivar, from Rare Find Nursery, is reportedly hardy and evergreen in Ohio (to -35°F), so it will be fine here in balmy Zone 7.
One other woody that I’d like to mention is the Camellia sasanqua that grows right next to the east-facing side of our foundation. I’d roped off and defended this large evergreen throughout the renovation and am happy to report it made it. It blooms from the end of October through to the first snows in November; in mild years its showy, single pink will still be around Thanksgiving weekend.
For everything, but especially for herbaceous plants, my design strategy involves wandering around the garden with several plants in each hand, and then dropping the pots onto the soil where I think they may look nice. To be absolutely honest, design wasn’t the first consideration when deciding what to plant: The first to get planted were the saddest cases. Newer purchases that were struggling in too-small pots got picked for planting before I rescued overcrowded plants that had happily settled into their holding beds. I may have to move some of these plants later, but I’ll sleep better knowing they’re happier and healthier than they were.
Sad cases or not, throughout the process as I pick up plants and set their pots onto the soil, I strive for a mix of foliage textures and colors – from chartreuse or variegated to dark green – plus a variety of bloom times and shapes.
Before planting each load of plants, I step back and try to picture the garden with everything filled in and at full height. I’ll step back in to rearrange and double-check height at maturity, plus I frequently reassess the amount of sun or shade a particular site receives and move things around to make them as happy as possible. Overall, my goal is taller plants toward the center of each section and shorter ones billowing along the edges of the pathways. When positioning and planting, though, I don’t worry too much about spread at maturity, since my objective is to have everything grow together to form a ground-covering mass of foliage and flowers. Then I plant and water before starting with a new load of plants – or improving soil in a new section.

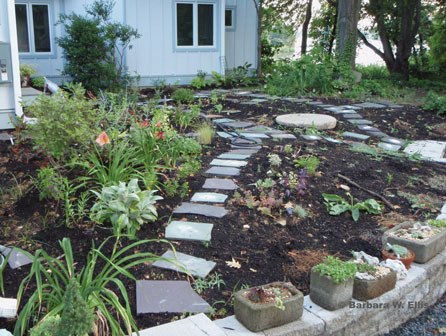
After: Plantings around the trees, at right, are in holding beds and will be gradually moved out and given more space.
I had planted about half the space in the front garden (see photo above)before summer weather arrived in earnest, and I had to move on to mulching and watering mode. Although I’ve popped a few annuals into empty spaces since then, for the most part summertime heat keeps me from planting, since it’s far easier for me to keep plants going in pots than in the garden once temperatures are in the 90s. We have a long fall planting season, and I’m already excited about getting the rest of the front garden planted come September.

