
You have heard of farm to table ? Here is garden to wall.
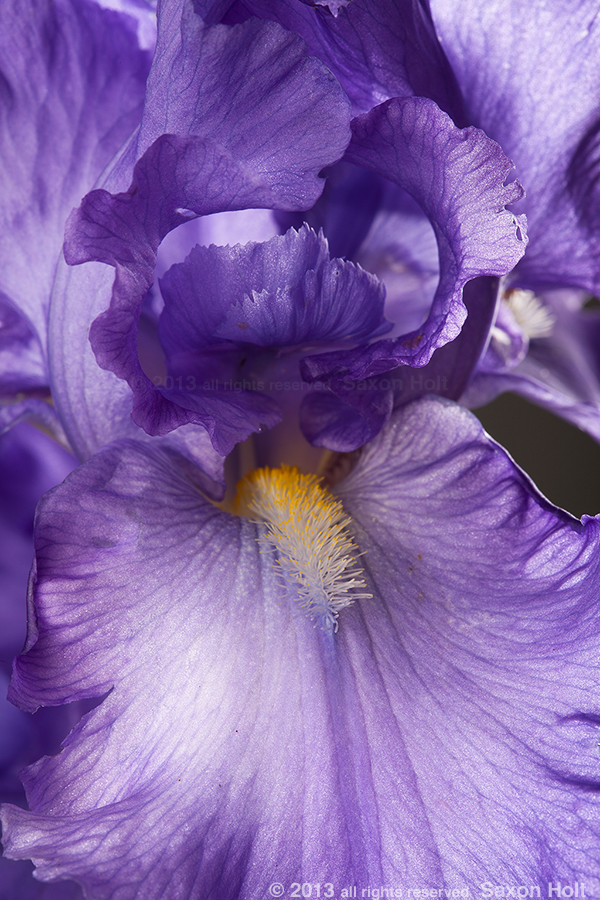
I simply could not resist making a PhotoBotanic illustration of this Iris in my garden. My studio was all set up from yesterday’s rose shoot and I wanted to practice photo stacking on a more complicated flower than a rose. Off into the garden . . . an Iris in mind.
More on the photo stacking tool later, a method to get maximum depth of field in one photo by using multiple exposures. But now, I am distracted by my subject.
I went looking for a big flower and I saw a magnificent stalk. The day’s work got much longer. I used another tool. There is an illustration here that needs to be made.
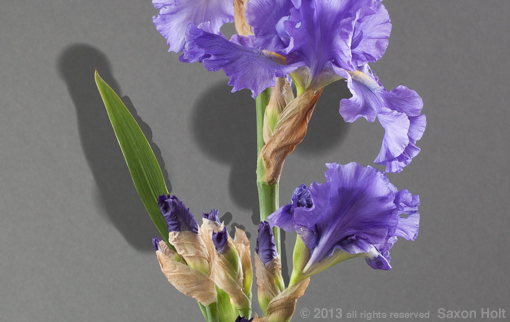
I usually know the species and cultivar of every plant in my garden. It is important for me to know my plants and important to editors when they illustrate a garden story. Not this iris. It is simply ‘Blue German Iris’ planted in front of the purple foliage of Black elderberry, Sambucus nigra ‘Diablo’.
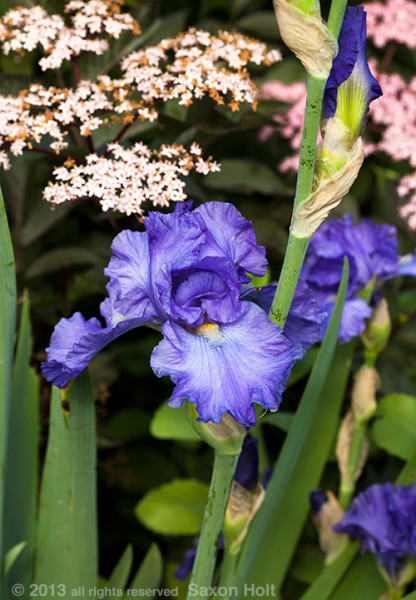
This iris was sent to me many years ago by some breeder or another for trials, and since Iris are my wife’s favorite flower, I stuck it in the border. I sure wish I knew its name now because every iris lover will want it. It is prolific. Many, many blossoms per plant – and it repeat blooms 3 times a year.
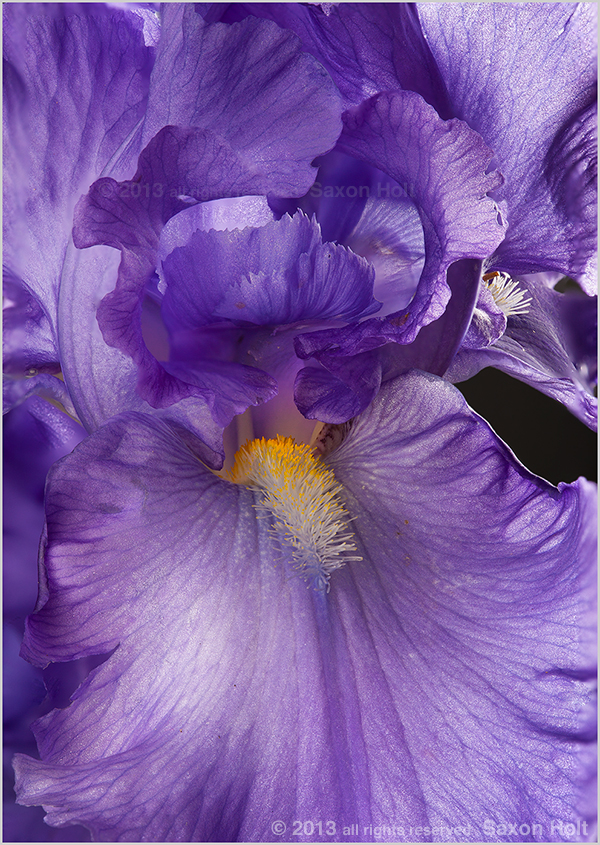
So, I went looking for a big complex flower to bring into the studio and stood agog at this iris. One stalk – 19 flowers. I gotta take a picture to this. Not just any ol’ garden picture, I needed to make a botanic illustration.
Which brings me back around to tools for photographing flowers. An indoor studio, with light control and free of wind, is great for serious flower studies. I won’t talk about the specifics of a studio set-up and the many ways you can set up a simple shooting space for yourself, but for the cleanest illustrations it is vital to have crisp photos to work with.
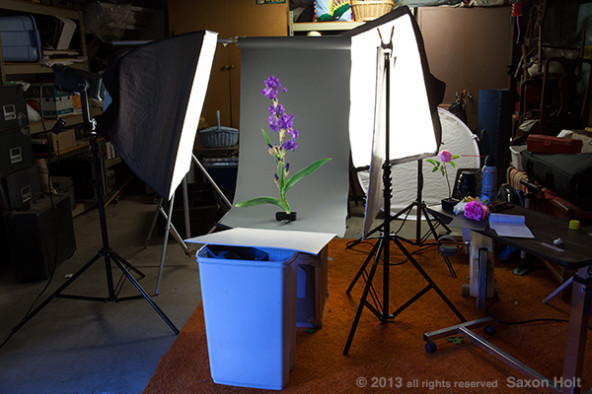
In my own garage/studio I use soft boxes of strobe lights and neutral gray background paper. The gray paper is its own tool.
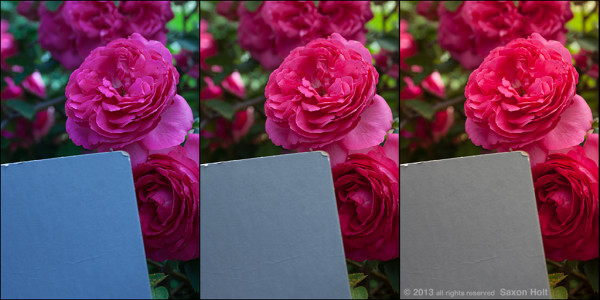
See those roses on the right side of the photo ? My studio was set up because of a rose project I have just begun. I need to have crisp images to use for my depth of field photo stacking tool – and I need to get color right.
What color is this rose ?
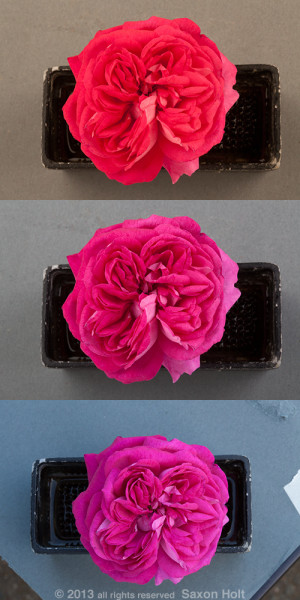
The correct color is the middle one, where the gray paper is “neutral”, neither too yellow, nor too blue. The top photo uses light bulbs as the light source, the middle is the daylight balanced strobe light, the bottom photo is in the shade outside my garage door. (All garden photographers have learned to deal with blue shade…)
The gray background paper is a built in tool for correcting color in studio photography. Given the known color of gray, it is a simple matter for software tools to find the right white balance. But of course most flower photography is done outside of a studio. That is when a gray card comes in handy. It is a simple tool that ought to be part of every flower photographer’s tool kit. More on gray cards and download.
When working in a garden I keep a gray card tucked inside my camera vest. In general, I trust my camera’s white balance settings but when I do close-ups of flowers, especially those with pinky-blue tones and especially for commercial advertisements and catalogs, I take a quick reference photo with a gray card.
 I don’t want to depend on my memory of a flower’s real color days or even weeks later when I process my photos on the calibrated computer in my office. Memory of color can change. Was that pink rose more orange ? more mauve ?
Sometimes true color is not important. The impressions and manipulation of color can be part of a interpreting a story. But when a breeder is the client, the story is true color and I can’t depend on my very subjective memory. Having a a gray card reference point of neutral gray makes it really easy to calibrate the color later.
Which is one reason I use the gray paper in the studio. Another reason is for using the silhouette and masking tools.
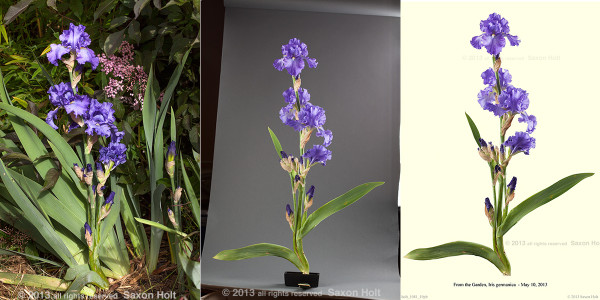
When I brought the iris into the studio it was with the intent to make a photobotanic illustration. I was not so concerned about the color since I was going to be working immediately with the files and the iris was from my own garden. The gray background paper also gave me a neutral background so that I can silhouette the flower and thus make the masking tool easier to use.
My tool of choice is a plug-in to PhotoShop – Topaz Remask3. Many photographers are happy with the tools already in PhotoShop, but no matter which specific software you have, in order to make a real flower illustration in the manner of the classic botanic prints you must use some sort of masking tool. It is a bit tedious, but really fun to do. Here is a link to one of my Mental Seeds blog posts where I go into more depth.
One of the hardest, most tedious parts of making the silhouettes is getting clean lines between the flower and the background. If you use a white or black background it can be hard to find the edges. In my iris picture with the gray paper I needed to darken some of the edges before I started using the tool. There are subtle highlights from my lighting that I did not want to lose, so by darkening the edges before trying to silhouette, I have made the tool easier to use.
Here is the final result. By using a cream background in the final print I was able to accent the white edge highlights. I don’t think I really wasted an entire day when I was supposed to be working on the roses and photo stacking.
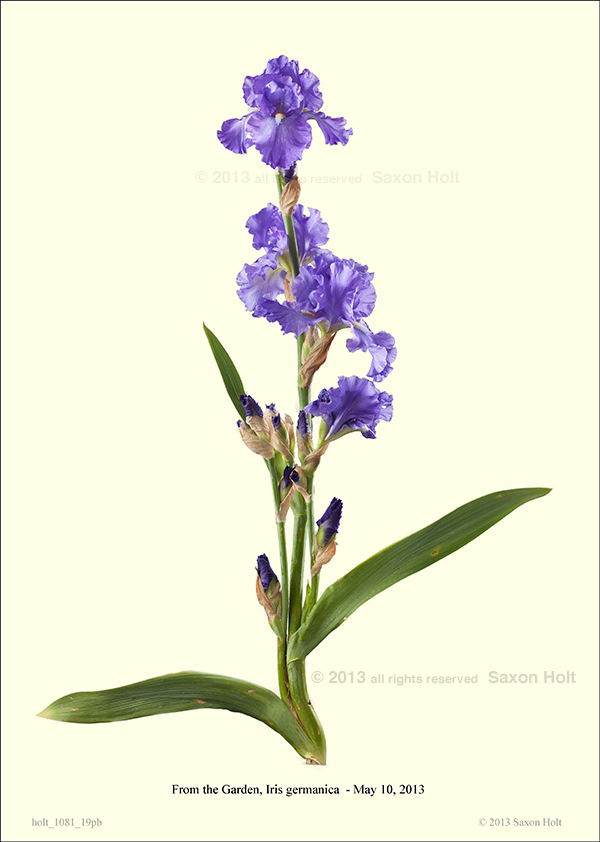
Here is a link to the Iris print. I print them myself.
Oh, back to the last tool for this post: photo stacking. In close-up macro photography, depth of field, sharp focus throughout the image is an inherent optical problem. The closer you get to a subject the less depth of focus is available with a lens.
But now, in the digital world using the computer, we can stack photos of different focus and get one photo. In the e-book I will go into more detail, but for now I will tease you with two images of the same composition.
The first image is all the depth of field I could manage with my macro lens:
Now with focus stacking:
For future tools and tricks I will fill in the “hole” on the right side of the image with Photoshop’s miraculous “content aware” filter. With that tool that can fill in areas of a photograph with content created from another part of the same photo we have new meaning to “the camera always lies”.
Latest posts by Saxon Holt (see all)
- The Green New Deal - November 19, 2018
- Leaning Pine Arboretum - January 31, 2018
- Landscape Panoramas 2017 - January 12, 2018